WORK JOURNAL DETAILS
The Work Journal allows you to view the forwarded and hired candidate details.

- The “Work Journal” is shown on Hiring Management home page.
- From here you can view the Candidate Name, the profile, skills, assignments and history details of the candidate.
REJECTED CANDIDATE LIST DETAILS
You can view the rejected candidate’s details in Rejected Candidate List. You can move the candidates back from Rejected Candidate List to Hiring Management home page using the “Make Available” link.

- Click on the “Rejected Candidate List” link on Hiring Management home page, to view the rejected candidates. Result: The Hiring Management screen refreshes and displays the rejected candidate records.
- Select the desired candidates you wish to make available again, by selecting the check boxes corresponding to the names of the candidates. In the Notes field, enter the reason for moving the candidates.
- Click on the “Make Available” link. Result: The Rejected Candidate List screen refreshes by removing the selected candidates from Rejected Candidate List. The removed candidates are now available again in the Hiring Management home page.
- Double clicking on any record in the Rejected Candidate List screen refreshes
Delete A Candidate
- Select the desired candidates you wish to delete, by selecting the check boxes corresponding to the names of the candidates. In the Notes field, enter the reason for deleting the candidates.
- Click on the “Delete” link to delete the candidates permanently from Rejected Candidate List.
- Click on the “Cancel” link to cancel and return to previous window.
FORWARD TO REVIEW
You can forward the candidates for reviewing to HR administrator.
Select the desired candidates by checking the check boxes corresponding to the names of the candidates. In the Notes field, enter the reason for forwarding the candidates. Select an employee from the Forward to Employee for Review drop down list at the top right corner, in the Hiring Management home page. Click on the “Forward to Review” link to forward the candidates for review.
|
| Note: You can view the forwarded candidates for reviewing under HRM/Hiring Review link. You cannot forward a candidate of Present Employee Type, for review. |
REJECT A CANDIDATE
HR administrator can reject the candidates from hiring.
Select the desired candidates by selecting the check boxes corresponding to the names of the candidates. Click on the “Update Status” Link to open the pop up displayed below. From the drop-down menu select “Reject”. In the Notes field, enter the reason for rejecting the candidates and click on the “Reject” link. Result: The Hiring Management home page refreshes by removing the selected candidates from the home page.

| Note: You can view the rejected candidates records under HRM–>Rejected Candidate List link. |
HIRE A CANDIDATE
candidate from the Hiring Management home page.
To hire a candidate:
- Select the required candidate and click Hire. The system displays the candidate record in edit mode.
- Review and update the details of the candidate, if required and finally click Hire to hire the candidate. The system displays the hired candidate as employee in the Employee Management home page.
Note:
- In HRM-Hiring Management – When you hire a candidate, the default tax type for the hired candidate will be W-2.
- While creating a new applicant if you select the “C-to-C” option in Tax Deductions screen and save the applicant. Now if you forward the applicant to Hiring Management and finally hire the applicant, then the applicant will become the C-to-C employee with the corresponding company as Consulting Vendor.
- When you close a placement for a candidate with recruiter contact, the system displays the record in HRM – Hiring Management. The recruiter contact company information will be populated in HRM – Tax Deductions screen for that candidate. When you hire the candidate that has been forwarded from closing placement, the system displays candidate as “C-to-C” employee along with the corresponding company as Consulting Vendor.
- When you close a placement for a candidate with recruiter contact, the system displays the record in HRM-Hiring Management. Now, when you hire the candidate that has been forwarded from closing placement, the system displays the default tax type for these employees as C-2-C.
- When you close a placement for a candidate without a recruiter contact, the system displays the record in HRM-Hiring Management. Now, when you hire the candidate that has been forwarded from closing placement, the system displays the default tax type for these employees as W-2.
- Candidates applied for the job in Web Site API will be displayed as 1099 employees in the Applicant Tracking home page.
- When you create a new applicant from Applicant Tracking, the default tax type will be “1099”.
- If two users attempt to hire an employee at almost the same time, the user who hires last will get the following message displayed: “This record has already been processed. Check the list of employees in Employee Management”.
- While hiring a candidate, if you specify the SSN (Social Security Number) that already exists in the system, the system displays the following message: “Employee with this Social Security Number already exists in Employee Management. Please try entering a different Social Security Number and Hire.”. If there is no SSN (Social Security Number) for the candidate, then the system checks for candidate first name and last name for duplicate checking.
| Note: You can view the details of hired candidates under Admin/User Management/New link. |
ADDING A CANDIDATE FOR HIRING THROUGH UPLOADING RESUMES
AkkenCloud Staffing provides an excellent option of uploading candidate resumes, to enhance user convenience. Using this option, you can upload the resumes in bulk, process and add as your candidates. The bulk uploading is usually done using zip files by adding the required resumes, in the zip file.
At a minimum, you need a zip file consisting of resumes of the required candidates to create profiles in bulk. This zip file is processed to grab the details of the candidates.
To create candidate profiles through uploading resume:
Click on the “New Hire” link on Hiring Management Home page. Result: The New pop up window is displayed.

The New pop up window has three radio buttons. Select the second radio button; I would like to upload resume(s) to create profiles, for adding new candidates through uploading resumes. Result: The pop-up window refreshes, with a text box and a “Browse” link.
1. Click on the “Browse” button and find the zip file located on your computer.
2. Clicking on the “Process” link. Result: The New pop up window refreshes and displays the Processing window to process the resumes included in the zip file.

3. It may take few minutes to process the resumes in the Processing window. The Processing window refreshes and displays “Profiles window” when the processing is finished, as follows:

Profiles window
The Profile window displays the list of candidates grabbed from the zip file.
1. The details of each profile are displayed in the respective columns of Profiles window, grabbed from the resumes.
2. Highlight any applicant record and double click on it to view or check the details of the candidate. Result: The Hiring Management pop up window with 2 tabs: Profile Data and HR Data with their sub tabs are displayed. You can verify and modify the profile of the candidate, in the different tabs and click on the “Hire” link, to add the candidate in the Hiring Management home page.
3. Click on the “Close” link to close the profiles window.
HR DATA TAB
HR Data tab helps to record the candidate’s immigration, compensation, assignment, tax deduction details etc. This tab contains the following sub tabs.
- Immigration
- Compensation
- Personnel Profile
- Assignments
- Reporting
- Tax Deductions
- Deductions
- Expenses
- Benefits
- Dependents
- Emergency Contact
- Paycheck Delivery
IMMIGRATION TAB

| Refer to the Immigration Tab topic, discussed earlier for more details. |
COMPENSATION TAB

Note:
- The Accounts Setup section in Compensation screen displays Income Account, Expense Account and Account Payable accounts for 1099 employees. (1099 employees are referred as Vendors).
- For all the remaining employee (W-2, C-to-C and none) types the Accounts Setup section in Compensation screen displays Income Account, Payroll Expense Account and Payroll Liability Account.
- If you generate any pay bill, then that amount will be deposited into Accounts Payable Account.
| Refer to the Compensation Tab topic, discussed earlier for more details. |
Click on the “Hire” if you do not want to fill up the details in all the tabs but want to hire the candidate. Result: The Hiring Management screen will prompt you only to fill up the mandatory fields, to hire the candidate.
PERSONAL PROFILE TAB
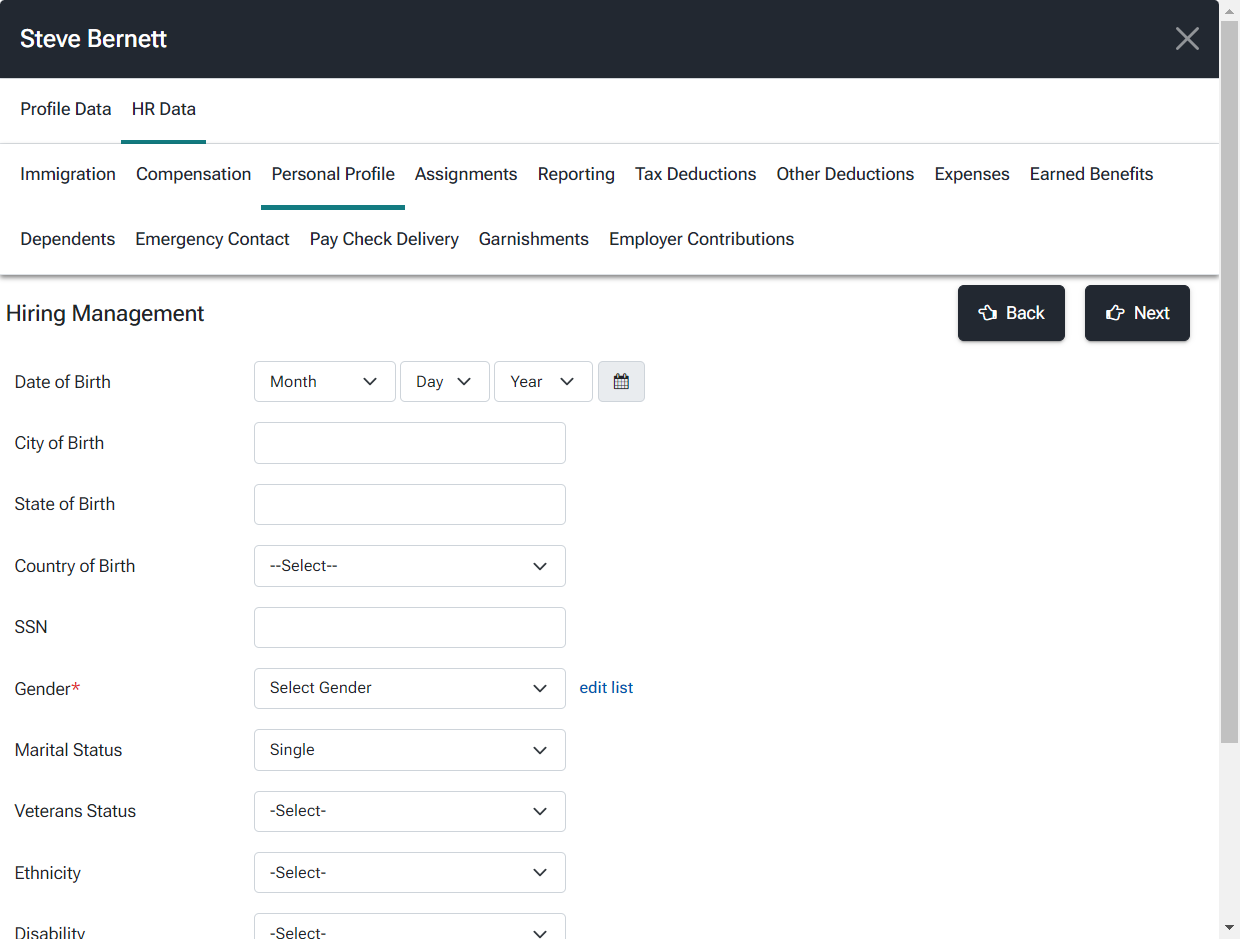
Note:
If the user specifies the SSN (Social Security Number) that already exists in the system, the system displays the following message:
“Employee with same Social Security Number already exists”.
| Refer to the Personal Profile Tab topic, discussed earlier for more details. |
ASSIGNMENTS TAB

| Refer to the Assignments Tab topic, discussed earlier for more details. |
Click on the “Hire” if you do not want to fill up the details in the rest of the remaining tabs but want to hire the candidate. Result: The Assignment screen refreshes by displaying the Hiring Management home page screen with the new candidate added in the list. The candidate will have only the details added so far.
REPORTING TAB

| Refer to the Reporting Tab topic, discussed earlier for more details. |
TAX DEDUCTIONS TAB

| Refer to the Tax Deductions Tab topic, discussed earlier for more details. |
OTHER DEDUCTIONS TAB

| Refer to the Deductions Tab topic, discussed earlier for more details. |
EXPENSES TAB

| Refer to the Expenses Tab topic, discussed earlier for more details. |
BENEFITS TAB

Note:
The Benefits Tab now displays the Other Benefits along with Earned Benefits that are created by the user in the HRM->Benefits section. All the benefits entered in the HRM->Hiring Management will be carried forward to HRM->Employee Management.
| Refer to the Benefits Tab topic, discussed earlier for more details. |
DEPENDENTS TAB

| Refer to the Dependents Tab topic, discussed earlier for more details. |
EMERGENCY CONTACT TAB

| Refer to the Emergency Contact Tab topic, discussed earlier for more details. |
Click on the “Hire” link to hire the candidate. If some mandatory fields have not been entered then the Hiring Management screen will prompt you only to fill up the mandatory fields, to hire the candidate. click on the “Hire” link again, after filling the mandatory fields. Result: The screen refreshes by displaying the Hiring Management home page screen with the new candidate added in the list.
PAYCHECK DELIVERY TAB

PROFILE DATA TAB
Profile Data tab helps to record the candidate information. This tab contains the following sub tabs.
· Candidate Info
· Contact Info
· Skills
· Education
· Work Experience
· Status
· Affiliations
· Add Info
· References
CANDIDATE INFO TAB

| Refer to the Candidate Info Tab topic, discussed earlier for more details. |
Click on the “Hire” if you do not want to fill up the details in all the tabs but want to hire the candidate. Result: The Hiring Management screen will prompt you only to fill up the mandatory fields, to hire the candidate.
CONTACT INFO TAB

| Refer to the Contact Info Tab topic, discussed earlier for more details. |
SKILLS TAB
|

Click on the “Hire” if you do not want to fill up the details in all the tabs but want to hire the candidate. Result: The Hiring Management screen will prompt you only to fill up the mandatory fields, to hire the candidate.
| Refer to the Skills Tab topic, discussed earlier for more details. |
EDUCATION TAB
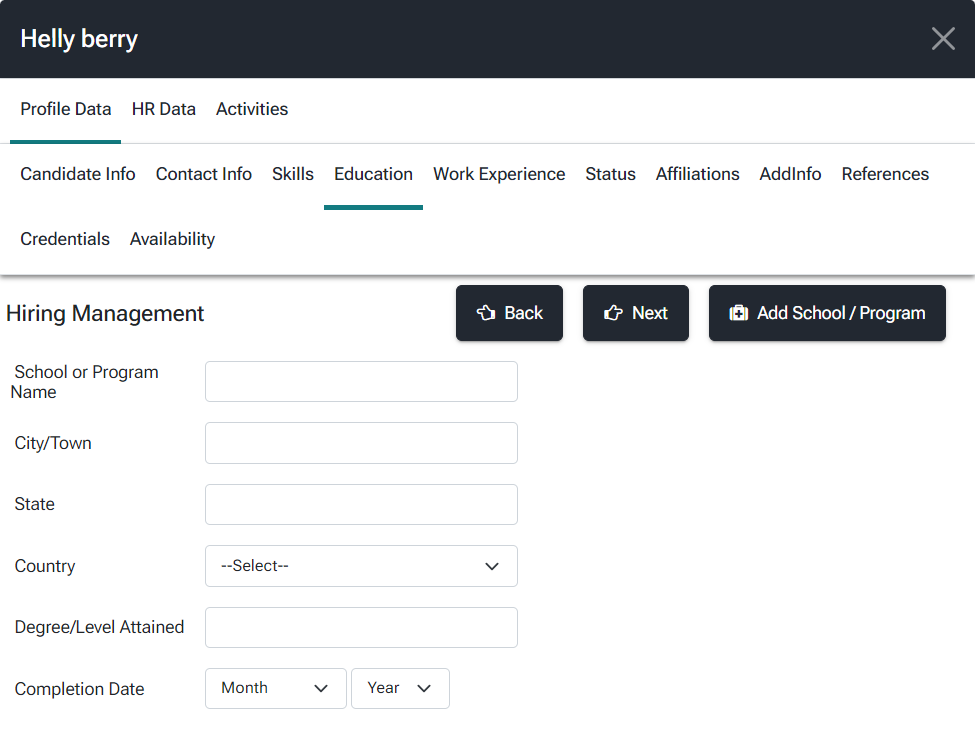
| Refer to the Education Tab topic, discussed earlier for more details. |
WORK EXPERIENCE TAB

| Refer to the Work Experience Tab topic, discussed earlier for more details. |
STATUS TAB

| Refer to the Status Tab topic, discussed earlier for more details. |
AFFILIATIONS TAB

| Refer to the Affiliations Tab topic, discussed earlier for more details. |
ADD INFO TAB

| Refer to the Add Info Tab topic, discussed earlier for more details. |
REFERENCES TAB

| Refer to the References Tab topic, discussed earlier for more details. |
HIRING MANAGEMENT HOME PAGE
In the Hiring Management Home Page, you can view all the active applicants who are required to be reviewed for hiring. You can forward applicants, who are working under client project to review. HR administrator can approve or reject the forwarded profiles. You can view all forwarded profiles in the work journal and can also view the deleted applicant records in the Rejected Candidate List. You cannot forward present employees for hiring, as they are already employees of the organization.
In the Hiring Management Home Page, you can find the following:
1. The Hiring Management Home Page has the following columns: Name, Job Title, Type, Job Type and Source. Each column will have their corresponding record details.
2. From the Hiring Management home page, you can create new profiles by clicking on the “New” link. See the Add a candidate for hiring topic for more details.
3. You can hire candidates by clicking on the “Hire” link. See the Hire a Candidate topic for more details.
4. You can reject the applicants by clicking on the “Reject” link. See the Reject a candidate from Hire topic for more details.
5. You can forward applicants for review by clicking on the “Forward to Review” link. For forwarding an applicant, you must select an employee from the Forward to Employee for Review drop down list at the top right corner, in the Hiring Management home page. See the Forward to Review topic for more details.
6. Also from the Hiring Management Home Page, you can view the rejected applicants’ profiles by clicking on the “Rejected Candidate List” link. See the Rejected Candidate List topic for more details.
7. You can view the hired applicants’ records by clicking on the “Work Journal” link. See the Work Journal details topic for more details.
8. See the Paging options topic to know, how to use the paging options displayed at the bottom of the Hiring Management page.
ADDING A CANDIDATE FOR HIRING THROUGH WIZARD
AkkenCloud Staffing provides you an option to upload candidate profiles for hiring, through wizard. Using this option, you can upload one candidate resume at a time.
To create candidate profiles through wizard:
- Click on the “New” link on Hiring Management Home page. Result: The New pop up window is displayed.

- The New pop up window has two radio buttons. Select the first radio button “I would like to create profile using the wizard” for adding new candidate profiles through wizard.
- Click on the “Process” link to use the wizard. Result: The New pop up window refreshes by displaying Hiring Management window.
Was this article helpful?
That’s Great!
Thank you for your feedback
Sorry! We couldn't be helpful
Thank you for your feedback
Feedback sent
We appreciate your effort and will try to fix the article